Confirm You Have the Right Navigation Product
Check that the chart covers the departure, destination, alternatives, and the water between them. Establish its provider, update status, intended use, and any limitations. A historical chart, general map, or attractive online image is not automatically suitable for navigation. Electronic coverage can also have gaps or require downloaded data that a preview does not provide. Test the actual chart arrangement aboard before relying on it. Ask the relevant hydrographic authority or product provider when the status is unclear. Familiarity with a previous edition does not remove the need to check what information is current.
Read Units, Datum, and Important Chart Information
Locate the depth units and the reference to which soundings relate. Numbers can represent meters, feet, or fathoms depending on the product and area. A fathom equals six feet, but a display may also convert data into units chosen by the user. Confirm the actual settings rather than assuming a familiar-looking number uses familiar units. NOAA’s sounding explainer identifies charted numbers as depth measurements and describes the role of depth contours. Use that basic distinction as the start of a fuller reading of the chart’s own information.
Charted depth is tied to a stated reference level rather than a promise that the same water depth exists at every time. Tide, river or lake levels, weather effects, and other local changes may affect the actual water available. Consult the appropriate current observations and predictions for the area. Make sure any water-level adjustment uses a compatible reference. Adding a value from an unrelated datum can produce a neat-looking but wrong result. Where references are unfamiliar, obtain instruction rather than treating every number labeled tide or level as interchangeable.
Read relevant cautions and source information before plotting close to a hazard. Survey quality and age can differ across an area. Dredged channels may have reported conditions that require current local information. A cartographic line does not establish that the entire area has recently been measured to the same precision. Preserve sensible clearance and consider uncertainty as part of the route. Information on a chart can be precise in appearance while its underlying measurements have practical limits that matter to your boat.
Understand Soundings as Part of a Bottom Picture
A sounding describes depth at a location, while contours and depth areas help show the surrounding shape. Read them together. A deep number near a shallow bank does not make the whole space equally deep, and widely spaced soundings do not prove uniform bottom conditions between them. Look for the pattern along the route and on both sides. The vessel needs enough room for actual movement, not only a theoretical centerline. Wind, current, steering corrections, and avoiding traffic can all move the hull away from the point you initially selected.
Compare expected depth with draft and an appropriate clearance margin. For arithmetic illustration only, a compatible charted depth of 2.8 meters plus a predicted water-level allowance of 0.7 meters gives 3.5 meters before considering uncertainty. Subtracting a 1.2-meter draft leaves 2.3 meters in that simplified calculation. It does not certify a passage. Wave motion, forecast error, survey limitations, local conditions, and the boat’s actual loaded draft still need consideration. Do not use this invented example as a recommended clearance for every vessel or situation.
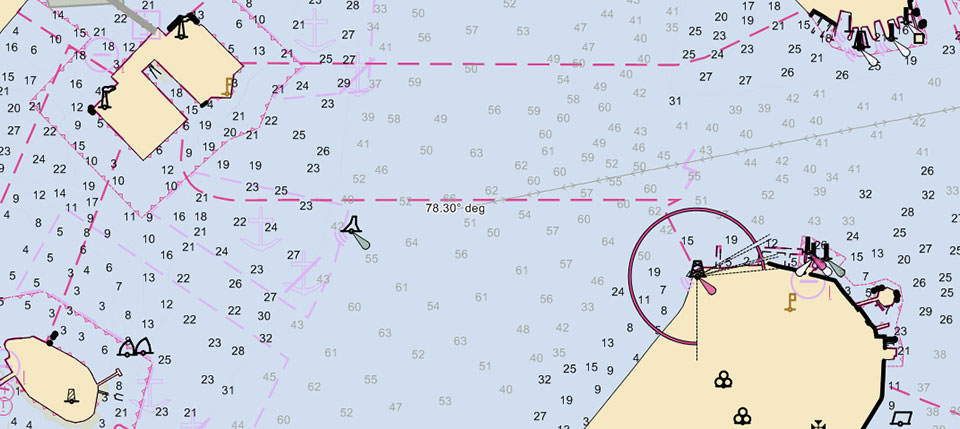
| Look here | What to read | What remains unknown |
|---|---|---|
| Upper-left yellow shoreline and neighboring figures | Compare the clustered nearshore soundings with those farther into the open water. | The cropped image alone cannot establish depth units, datum, or a safe clearance. |
| Blue depth areas and their boundaries | Follow the surrounding bottom pattern rather than selecting one favorable number. | A colored area does not guarantee every point has been surveyed equally. |
| Shoreline projection at lower right | Inspect the confined approach and nearby symbols before imagining a route past it. | No route, clearance, bridge reference, or present aid status is certified here. |
Inspect Hazards Before Drawing the Final Track
Look for rocks, wrecks, obstructions, shallow patches, drying areas, and restricted zones before placing route points. Learn the specific symbol and associated attributes rather than assigning a meaning from color alone. Some hazards have a known depth, some have uncertainty, and some are described through a category requiring additional interpretation. A chart symbol may represent more than a point to steer around casually. Identify the space you intend to leave and the reason it is adequate for the vessel, conditions, and available information.
Check shorelines and exposed features at the scale appropriate to the approach. A route that appears to pass comfortably between two objects at a broad scale may reveal an obstruction or shoal when inspected correctly. Conversely, zooming far beyond the useful data scale can create an impression of precision that is not in the survey. The important question is what the product actually knows about the water. Magnifying pixels or symbols does not create new hydrographic detail.
Identify areas where anchoring, access, or other activities are restricted. A clear patch of chart does not necessarily mean every activity is allowed there, so consult relevant notices and local rules. Cable and pipeline corridors, environmentally sensitive areas, and controlled facilities deserve attention before the vessel arrives. Record the restrictions that affect the intended stop or diversion. A route can be navigationally feasible and still lead to a destination where your planned activity is not permitted.
Review every connecting segment, not only the waypoints. A pair of positions in deep water can be joined by a line that crosses a hazard. Inspect turns and the space needed to make them with the actual boat. Automatic route tools require the same scrutiny and depend on their settings and data. Keep the route understandable in your own terms. If you cannot explain why a leg passes through suitable water, the plotted line is not ready to be followed.
Use Scale to Change the Question You Are Asking
An overview helps you understand the coast, alternatives, and relationships among route legs. A larger-scale local view helps examine the harbor, channel, and approach details. Use both deliberately. On an electronic chart, check whether changing zoom also changes the underlying data, object detail, or display filtering. Do not remain so far zoomed in that the next hazard or route turn falls outside the screen. Equally, do not use a broad view to justify close passage through a narrow area. Scale is a tool for asking different questions about the same voyage.
Match Charted Aids With Features Outside
Identify the expected buoy, beacon, light, or conspicuous shore feature before using it as a position check. Compare the relevant attributes, not simply a familiar color. Location, shape, numbering where present, and light characteristics can help establish identity. Learn the local aid system and its direction conventions. A floating aid can move or be temporarily changed, so keep appropriate clearance and consult current notices. The chart supplies context for the aid rather than turning it into a fixed point you can approach without judgment.
Use disagreement as information. If a marker, shoreline, or depth pattern does not match the expected position, slow the situation down in safe water and investigate. Possible causes include a mistaken identity, the wrong display setting, old data, or a displaced aid. Do not select whichever clue supports continuing the original route. Compare independent observations and preserve space to turn or wait. Careful chart reading includes knowing when the observed world no longer supports the interpretation you began with.
Check Overhead Clearance Separately From Water Depth
Bridge and overhead-cable information uses its own definitions and references. Read the chart, official structure information, and current notices rather than assuming a displayed clearance is measured from the same datum as nearby soundings. Water level can change the space below a structure in a different practical way from its effect on under-keel clearance. Know the vessel’s actual air draft, including equipment that projects above the main structure. Allow for the conditions and uncertainties relevant to that location.
Movable bridges introduce operating procedures and timing as well as physical clearance. Confirm the appropriate official information before arrival, including any restrictions or temporary changes. A charted opening is not an assurance that the structure will be available when you reach it. Plan a safe waiting position and an alternative if needed. Avoid arriving in confined current with no practical option while trying to discover the bridge’s operating process for the first time.
Keep measurements current after modifications or loading changes. A new antenna, arch, or other equipment can change the vessel’s highest point. A different load can affect draft and the relationship of the boat to the water. Record the dimensions you actually need for planning and make them accessible aboard. A remembered figure from the original brochure may no longer describe the boat. Treat conflicting measurements as something to resolve before committing to a clearance-critical passage.
Learn the Electronic Chart’s Object and Display Controls
Electronic charts may carry information that is not fully shown in the default view. Learn how your equipment reveals object details, cautions, sources, and other relevant attributes. Check the manufacturer’s instructions for safety settings, depth shading, orientation, and filters. A chosen color scheme or safety contour is a display aid, not a physical boundary in the water. Understand the inputs behind it. An incorrectly entered draft or depth preference can make a reassuring view less useful than the underlying chart data would allow.
Practice switching between overview and detail while safely secured, then use the process on manageable trips. Keep enough context on screen to understand the next leg and nearby hazards. Confirm the coordinate format before entering positions from another source. Degrees and decimal minutes, degrees-minutes-seconds, and decimal degrees can describe the same place in different formats. A position entered without the proper conversion can identify another location entirely. Validate the plotted position against the intended geographic feature before treating it as a waypoint.
Use a Reference Instead of Guessing at an Unfamiliar Mark
Keep the relevant hydrographic authority’s symbol reference and the chart provider’s guidance available. NOAA’s Office of Coast Survey provides access to United States chart products and learning material, including references for symbols and chart use. Recreational equipment may portray objects differently, so consult its own legend and object information too. The useful habit is to verify the meaning that affects the route. Guessing becomes particularly costly when a small modifier changes a hazard’s depth or a light’s identity.
Practice a Complete Reading Before the Next Passage
Take a short familiar route and explain it from start to finish while at the berth. Identify units, references, safe water, hazards, expected aids, turns, relevant clearances, and a diversion. State what you expect to observe at useful checkpoints. Ask an instructor or experienced qualified navigator to challenge the assumptions. This reveals gaps without the pressure of a moving vessel. It also turns chart reading from symbol recognition into a connected account of why the voyage is feasible.
After a controlled trip, compare the planned interpretation with what you observed and update the method. Keep track of settings or references that caused confusion. Learn more difficult areas gradually, with training appropriate to the boat and waters. Reading like an experienced navigator means making the chart’s assumptions explicit, checking the whole route, and responding to uncertainty before it becomes a close-quarters problem. The skill is a disciplined interpretation of evidence, supported by practical observation and sound boat handling.